Running Drills for Acceleration
By: Patrick Beith
Being able to accelerate quickly and powerfully is probably the most important skill that needs to be improved in all athletes. Athletes in every sport need to be able to run as fast as possible as quickly as possible. From getting off the line fast in football, to beating your opponent to the ball in soccer, to exploding out of the blocks in track; each of these athletes need to be as efficient as possible to be able to generate speed in a short period of time.
Acceleration development is a major focal point in our training program. We therefore spend a lot of time working on proper acceleration mechanics. The reason being that most sports never really need their athletes to sprint over 30 meters. How often do you see a football player break away for a 50 yard gain or a field hockey player need to sprint at top speed from mid field without breaking stride? Not often at all. In fact, most plays happen at short bursts of 10 yards or less. Even for a 100 meter sprinter, the acceleration phase consists of 64% of the race (from a time standpoint).
Ever wish you had a cheat sheet to help you coach and cue your athletes on proper acceleration mechanics?
Get your free acceleration checklist here.
First: What is Acceleration?
Acceleration is the rate at which the speed of an object is changing. Acceleration takes place the first 0-30 meters or to about 3-4 seconds from the start of a sprint. After approximately 30 meters, acceleration turns into maximum velocity and top speed is hit. Workouts to improve the acceleration of an athlete will follow in the same distance parameters. Running repeat sprints of 20 meters for example with full recovery is an option for an acceleration workout. Instead of giving you some basic running workouts, I want to give you some of my favorite acceleration training drills. These drills will not only create faster athletes, but will also help develop proper acceleration mechanics at the same time.
Before giving you the speed drills for acceleration, let’s go into what constitutes proper acceleration mechanics so you know what to look for with your athlete. Being able to cue and make corrections to your athletes’ form is what is really going to make these acceleration drills successful.
A Breakdown of Acceleration Mechanics and Other Considerations
1) Stride Length = Short to Long
Starts off short and increases until maximum velocity is reached (when the stride length is optimal)
2) Ground Contact Time = Long to Short
Ground Contact Time is the amount of time each foot spends on the ground. It is longest at the beginning as the body is trying to overcome inertia, (the weight of your body fighting gravity) to try and create velocity through force application. This takes a great deal of strength.
3) Shin Angle with ground = Small to Large
The shin angle is going to determine the force application to the ground as well as the projection angle that the athlete is going to drive out at (a roughly 45 degree projection angle is ideal). The shin angle opens up and increases throughout acceleration and into maximum velocity.
4) Velocity = Slow to Fast
Velocity is both the speed and direction that the body is moving. As the athlete accelerates, the rate and distance will increase with time.
5) Stride Frequency = Slow to Fast
Like ground contact time, it starts off slower (though still quite high) and increases until stride frequency reaches optimal level at maximum velocity.
6) Heel Recovery = Low to High
Heels should recover quickly, with limited backside mechanics, and shouldn’t involve large amplitudes of motion behind the hips. During acceleration, especially the first 6-8 steps, you want to minimize your backside mechanics. Backside mechanics in sprinting are movements occurring behind the center of mass. To put this more simply, think of the drill ‘butt-kicks’ as having a lot of backside mechanics and a drill like ‘high-knees’ will have little amount of backside mechanics but a lot of frontside mechanics. Use the cue ‘running on hot coals’ to give people an image about how to quickly recover their heels to their butt.
7) Body Position
- – Foot strikes on forefoot- foot should strike directly below or slightly behind the hips
- – Looking for Triple Extension of the driving leg– ankle, knee, hip
- – The body is driving out at a 45 degree angle to the ground. (This is a straight line from your head to your back leg.)
- – Keep the heel recovery low
- – Drive the lead arm (same as front leg) up as you begin to sprint.
- – Step over the opposite knee and drive the foot down into the ground to create maximal force. (Ankle steps over the knee.)
- – Face and neck relaxed
- – Tight stomach, flat back, hips forward
- – Arms – elbow is approximately at 90 degrees
**** Quick Acceleration Tip – Often in the acceleration phase, athletes are concerning themselves too much with trying to be quick with their legs. Instead of trying to drive out and be powerful, athletes are ‘spinning their wheels’ and are not getting triple extension (ankle, knee, hip). We want the athletes to ‘feel their feet behind them’. If you are getting the sensation of your feet driving well behind your center of mass, then you know you are finishing off your leg drive.****
As I said previously, speed drills also give us an opportunity to teach cues for acceleration. We use speed drills to break down certain aspects or parts of the whole body for acceleration or sprinting. For example, I use cue like: ‘drive down’ during a speed drill in practice. This gives the athlete a frame of reference to use when I need them to make adjustments to their form while sprinting. This will help the athletes carry over the theory of what needs to be done so they can apply it when performing high speed sprinting.
Every time you sprint you should be working on technique. You want your athletes to have proper running technique ingrained in their heads so when it is time to sprint, they can feel when everything is happening smoothly.
Therefore, we need to use speed drills to help reinforce sound running and acceleration mechanics while also making our athletes stronger, faster and more powerful.
Acceleration Training Speed Drills
Short Hill Work
These are great acceleration speed drills when you have large groups since you do not need any expensive equipment. Hills can naturally help athletes with their stride frequency and also help promote quick arm action. Also, athletes that tend to rotate a lot at the hips and cross over with a side-to-side running action will have to quickly re-evaluate their flawed running mechanics when doing hill work. If they are running side-to-side, then they will not be going anywhere, and will have trouble getting up the hill. Therefore, this short hill work will help improve their straight ahead running.
Hill work is perfect for acceleration development as it puts the athlete in proper acceleration mechanics naturally without any tools or cues. You are bringing the ground up to them as they will be driving out and running in the 45 degree angle to the ground.
Sample Hill Workout:
8 x 20 meter hills at 15 degree gradient. Walk back down with a 2 minute rest between each repetition.
Stadiums
If you have a nice set of bleachers or stadium stairs in your area, then I suggest you take advantage of them. When performing stadium drills for acceleration work, make sure that your athletes are skipping a step so they are running every other step. Running every other step on the bleachers mimics acceleration mechanics similar to short hill work. It is putting the athletes at that 45 degree body angle while they are running the stairs.
If you run up every step and do not skip one in between, then your body will be up taller in more of an upright maximum velocity position. Skipping steps is important because maximum velocity work is not the goal of this drill.
Wall Drill
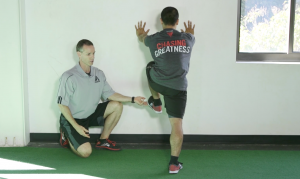 The Wall Drill is also covered in detail in the NSPA’s Certified Speed & Agility Coach course. Have athletes stand with their hands against a wall with the arms parallel to the ground. The feet should be behind the hips and the athlete should be at, approximately, a 45 degree angle to the ground. The torso should be erect, hips forward, stomach and lower back tight so that one could draw a straight (45 degree) line from the head, through the hips to the ankles.
From this position we implement a marching action. Have the athlete raise the right leg so that the ankle is beneath the hips, toe dorsiflexed. On your command, the athlete will march, alternating legs, for a given number of repetitions. They will then finish with their leg in the original starting position.
Partner Assisted – March
Exactly like the Wall Drill except a partner is in the place of the wall.
Have the two partners face each other. The first person leans in the proper acceleration position (45 degree angle), while their partner is holding them in this position at the shoulders. Have your first athlete bring their right knee up, while keeping the ankle behind the knee and the toe up towards the shin. This is triple flexion on the front side: the position your athlete would be in during acceleration. On the support leg (left leg), have your athlete in triple extension. The left leg will be in a straight line with the hips, spine and head.
The athlete’s partner will be resisting slightly, keeping the working athlete at the desired 45 degree angle. The athlete is then going to be marching for 10 steps, forcefully driving the front-side leg down and back. The forward movement will be short in distance with the focus on the driving motion. You want your athlete to be able to feel their feet behind them during these drills so it seems natural when it comes time to accelerate during games.
Face and Chase
This drill is pretty much an extension of the Partner Assisted March drill. This time the ‘marcher’ is running instead of marching, and the partner is providing more resistance. The focus is still on providing force application into the ground.
The partner is now resisting, moving backwards, for 5 meters. At this point, the partner lets go and releases. The partner that was resisting and now released will then turn, run, and try to beat the person they were resisting to a cone at 15 meters.
We have extended these distances out and also turned them into a tag game (Face, Chase and Race).
For more fun and effective speed games, check out Complete Speed Games here.
Various Starting Positions
Instead of bringing the ground up to the athlete to create the 45 degree angle as we did with the hill work, we are now going to bring the athlete down to the ground. In bringing the athlete to the ground, we can then have them start in different positions on the ground. The body wants to get up as fast as possible. The best way to do that is to drive out in proper acceleration mechanics without having the athlete think too much about it.
Weaker athletes have an extremely tough time accelerating from a standing or 2 point position but are successful creating the acceleration form from a ground based position. Essentially, we work from the ground up. As our athletes get stronger and better mechanically, we then use the more vertical stances for our acceleration work. You would still use the distance parameters of 10-30 meters per run for your sprint workouts when you perform this drill.
Here are some examples of the various starting positions you can use:
– Laying on back
– Push-up ‘Up’ position
– Push-up ‘Down’ position
– On 1 knee (always switch)
– Seated (facing forward)
– Seated (facing Backwards)
– 3 point position
– 4 point position
– Falling start
– Position specific
Med Ball Starts
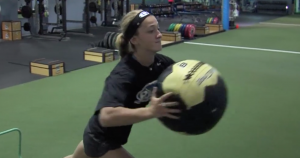 The athlete starts with both feet shoulder width apart, while holding a medicine ball at their chest. Next, have your athlete provide an explosive chest pass, trying to propel the medicine ball as far as possible. This will then cause the athlete to use their legs and drive out. The instant the ball is released, have your athlete keep that momentum going by sprinting out to 15 yards. This is a good exercise for athletes that don’t seem to be going anywhere their first couple of steps of acceleration and consequently need to become more explosive.
Ball Drop
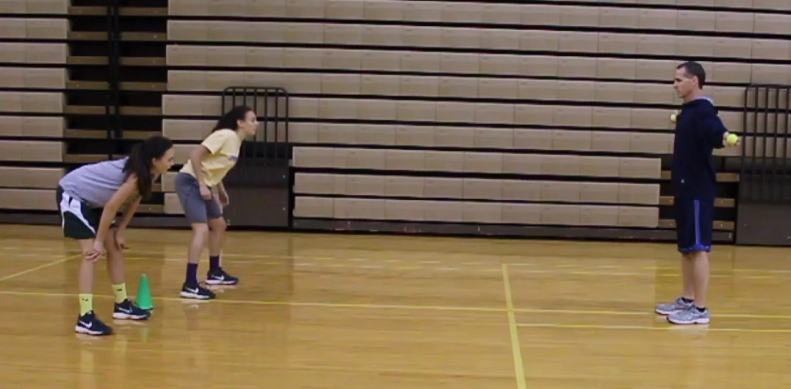 You can start this drill having the athletes use the various starting positions as described above. The coach stands 10 feet away (this distance can be moved up or back depending on the level of athlete) with a tennis ball in his or her hand. The coach’s arm is at shoulder level held out to the side. The coach then drops the ball and once the athlete sees the ball released, he/she must catch the ball before it bounces twice.
These are great drills to work on not only acceleration mechanics but also reaction time: an extremely important characteristic in all sports.
Use the speed drills provided for acceleration. Make sure that your athletes get the most out of them by not sacrificing form in any of the drills.
About the Author:
 Patrick Beith is the Owner and Founder of Athletes’ Acceleration, Inc. Patrick holds his Bachelor of Science in Exercise Physiology. He is recognized by National Strength & Conditioning Association (CSCS), National Academy of Sports Medicine (PES), American College of Sports Medicine (HFI), International Youth Conditioning Association (IYCA), as well as USA Track & Field Coaching Level II (Jumps, Sprints, Hurdles and Relays). A renowned coach, Patrick specializes in speed training & athlete development of various levels. As a performance coach, his concepts and products have helped thousands of athletes & coaches around the world. From athletic development to fitness business development – consulting, lecturing and teaching – Patrick strives to help each client achieve their goal and to reach their full potential. To learn more about Coach Beith click here.
Recommended Athletes Acceleration Products




0 Comments for “Running Drills for Acceleration”