How to Teach the Clean
By: Wil Fleming
The clean is the first portion of the second lift, the clean and jerk, contested at competitive weightlifting competitions. It is sometimes considered the king of all lifts because in weightlifting competitions, they are typically won by the guy or gal with the biggest clean and jerk (and not necessarily the snatch).
Of course, you probably have known the clean for much longer. Since you were first introduced to its ugly cousin the power clean in high school weightlifting class, crossfit class, or by a random person in the gym (ugly referring to the level of technique that we all started with).
The clean is one explosive movement to bring the bar to the chest, and because of its shorter nature than the snatch, significantly higher loads can be completed in the clean than can be completed in the snatch. The heavier loads in the clean typically mean that I teach it second, primarily because cleaning before you snatch leads to slow arms in the turnover portion of the lift while going overhead in the snatch.
How to teach the clean: we teach the clean to our athletes in a top down manner; that is you will read of the technical elements of the clean from the top first, starting at the receiving position, and ending with the bottom, the start position at the floor.
This was chosen as the way to design this article so that you can learn the clean just as I teach the clean in seminars and to my athletes. From the top down, starting at the racked position and progressing to the floor. If you want to read it in the reverse order, scroll down and read the sections in reverse, it will work either way.
We teach the snatch in the same manner as the clean and with the same names:
Racked position
Hip Position
Knee Position
Floor Position
Many of the fine details of the two movements, positions and timing, are distinct. It should go without saying that learning a sound technical base in the snatch will help your clean and vice versa.
How to Teach the Clean: Download the instructional guide here.
The Little Stuff About the Clean
The grip
I hope by now that it goes without saying but the hook grip should be used. Nonetheless, I won’t take anything for granted. Just last night I was coaching a young Olympic lifter who was attempting a PR clean and jerk, when all of the sudden the bar flew right out of his hands during the clean. Asked if he was hook gripping, he responded “I didn’t know I should for the snatch AND the clean,” so I am not going to take anything for granted. Use the hook grip on the clean.
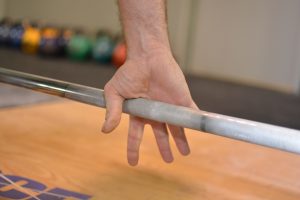
Unlike the snatch, where releasing the hook grip is optional, the clean rack position will almost always necessitate releasing the hook grip at the shoulders. This does not need to be taught, as most athletes will do it naturally.
The width of the grip in the clean should be wider than the shoulders. Find this out by bringing the bar to a front squat rack position and gripping the bar fully. If your hands touch your shoulders, this grip is too narrow.
Generally speaking the upper arms should be able to be comfortably parallel to the ground in this position. At this width, there won’t NEED to be any adjustment to the grip to complete the jerk.
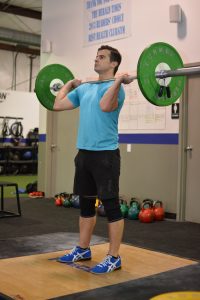
Whereas the snatch requires a grip that keeps the bar close to the hip crease when fully extended to promote a correct bar path, in the clean this is not necessary. For most athletes, the idea of keeping the bar at hip level is not necessary for a good lift, although it can certainly be beneficial to bring the bar closer to the hip to complete the 2nd pull and begin the 3rd pull. In most instances though, limitations in shoulder external rotation will prevent athletes from racking the bar with an extremely wide grip.
A wider grip in the clean may be employed to bring the bar closer to the hip during the pull, and also during completion of the jerk portion, to require a shorter distance until the bar is overhead.
Top Down Positions and Movements for the Clean
Racked (Receiving) Position
We start with the destination of the clean as our starting point to learning the technical pieces of the lift. Like working backwards on a map, we must know our final point of the lift.
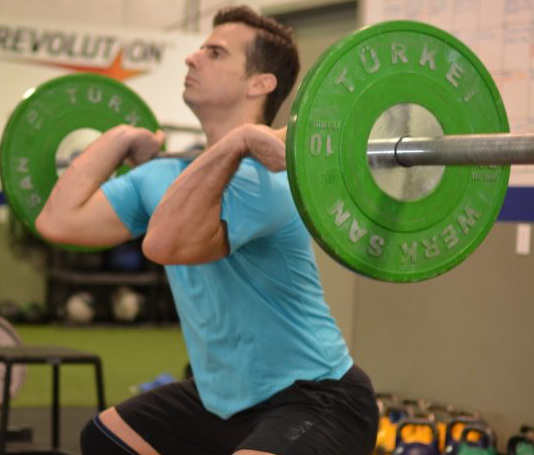
The goal of the clean is to receive it at the chest, or more appropriately, shouldered position; the torso close to vertical; at the bottom of a squat position, initially, and then stand completely erect. This is the front squat position.
The receiving position must be solid and sound for an athlete to support maximum weight on the shoulder level, and racked in the front to boot. The racked on the shoulder and in front portion of the receiving position is what makes it inherently unnatural. Holding maximum weights at this spot means that there is very little room for error or deviation from the correct positions.
To establish the correct racked position, we must think of the combined weight of the unit that is the lifter and the barbell. Again, the receiving position must be centered over the base of support that the athlete has created on the platform. Forward or back of that line will cause the bar or the lifter to topple over.
A vertical line, leading from the barbell to the floor, should be drawn in the clean. The head and neck are in the way of creating a simple vertical column. A vertical torso is required to maintain the proper line of mass from the bar to the ground.
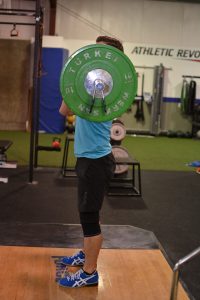
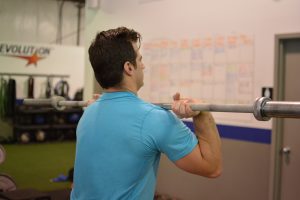
To achieve the correct rack position, use the grip outlined above and bring the bar to the shoulders. The elbows should be driven up, and kept apart. The shoulders should be shrugged up and pushed forward. The upper back (thoracic spine) long and extended.
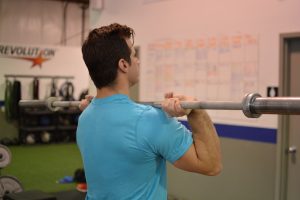
The shoulders are used as the actual shelf on which the bar rests and must be positioned well to use them as your primary point of contact. Previously, I said that the shoulders must be shrugged up and pushed forward, but there is a particular method with which you must do this.
Shrugging the shoulders is simple, just shrug up to push against the bar. More detail is needed when it comes to pushing them forward. Simply shrugging does not do enough to create a solid shelf for the barbell. With shrugging the shoulders up into the barbell, alone, you will find the bar resting uncomfortably on your clavicles. Instead, the shoulder blades must also be protracted (the opposite of retracted), so that the humerus and shoulder can glide forward.
.
.
.
.
.
Protracted Shoulder Blades vs. Thoracic Kyphosis
This motion of protraction keeps a stable spine position, one in which the shoulder blades glide around the rib cage. Alternately, and incorrectly, some athletes will make this motion happen by rounding their upper back into an exaggerated thoracic kyphosis.
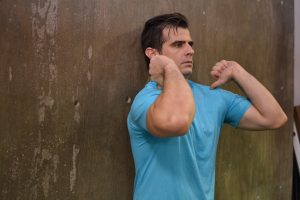
To feel this position correctly, try achieving the rack position with your back against a wall. Push the shoulders forward while maintaining a flat upper back position against the wall.
It can be a common problem in many new athletes to the Olympic lifts, but a poor rack position might not lead only to a missed lift, but can also lead to a restriction of the carotid arteries and a potential for black out. A strong position with the shoulders forward and up should keep the bar off the neck.
There are a couple ways to grip the bar in the hands. The first and most common way for newer lifters, especially those with mobility restrictions, is the fingertip grip. This grip means that the hands are not fully around the bar but instead are placed at the fingertips. The bar is racked in the same position as described above, but the hands are released and the heel of the hand is above the bar.
A fuller grip can be maintained throughout the clean for athletes that possess the mobility and anthropometrics to do so. While this grip can be uncomfortable, it can lend some stability and a feeling of strength to the receiving position and the eventual front squat.
Ultimately, experimentation with both grips in the front squat alone, and as the result of a clean should be used to determine your grip in the racked position.
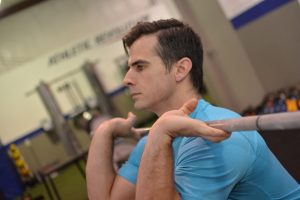
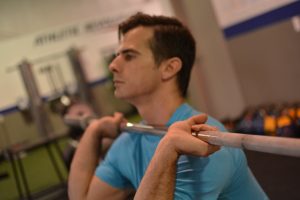
Racked Position: Fingertip Grip Vs. Full Grip
Front Squat
For an athlete to progress in the lifts it is important to be able to maintain the correct racked position while also in a deep squat position. This can certainly confound the issue when the requirements of adequate scapular movement, thoracic extension, and shoulder external rotation are coupled with the new demands of hip mobility, ankle mobility and core stability that are required in any squatting movement.
Many athletes are capable of the racked positions when standing, but the requirements while squatting mean that the athlete must be more than just adequately flexible. Searching for joint mobility at other links in the system, when lacking in the ankle or hip, mean that an athlete will be unlikely to maintain the amount of tension necessary to come up with heavy weight out of a front squat.
Similar to the snatch, great mobility in the clean starts at the ankle. Athletes must be able to get great degrees of dorsiflexion (45o) much greater than the standard (90o). Hip flexion at the bottom position is also roughly 45o. This is definitely not a “parallel squat”.
The torso should be nearly vertical in this bottom position, whereas in the snatch there is some degree of variation to allow for the torso to be inclined forward just slightly. The clean does not allow for those liberties to be taken. Forward inclination of the torso means that they weight has most definitely shifted forward and the bar will be lost.
The feet should be slightly wider than hip width, and the toes may be slightly angled out. Upon descending the knees may go out slightly, but in general should only track directly over the small toes.
Gaining additional mobility to the bottom position cannot be done by only taking the hips lower. Again, the athlete should seek to remove the horizontal space between the hips and heels, not focus on the vertical space between the hips and the platform.
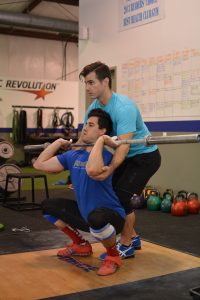
A simple drill to find more space is the partner squat stretch. Where one partner holds the barbell in the racked position and the other provides light pressure to the sacrum and lumbar spine to both maintain a neutral curvature and also force the hips lower.
An inability to maintain thoracic extension in the bottom position of the front squat will lead to the athlete losing tension and having an exaggerated thoracic kyphosis while the bar is racked. While definitely not sound, lifts can be made in this way, but it typically can lead to undue stress on the upper back, or an inability to complete the jerk because of the strain placed on the body during the squat up.
Lastly, continually driving up the elbows is a great way to maintain stability and position throughout the front squat. This cue typically maintains the extension of the thoracic spine and ultimately keeping the torso position more upright.
Clean from Hip Position
With the racked position in order it is time to begin moving the athlete towards the ground with the clean. The first position we arrive is the location of the final pulling position, or the end of the 2nd pull. That is, the position where the athlete finishes their action on the bar going up, and must transition to acting before it reaches a velocity of 0 (and starts to head back to the ground). This position is almost entirely similar to the snatch, except the athlete will find the bar resting slightly lower on the thighs.
Starting Position for Clean from Hip
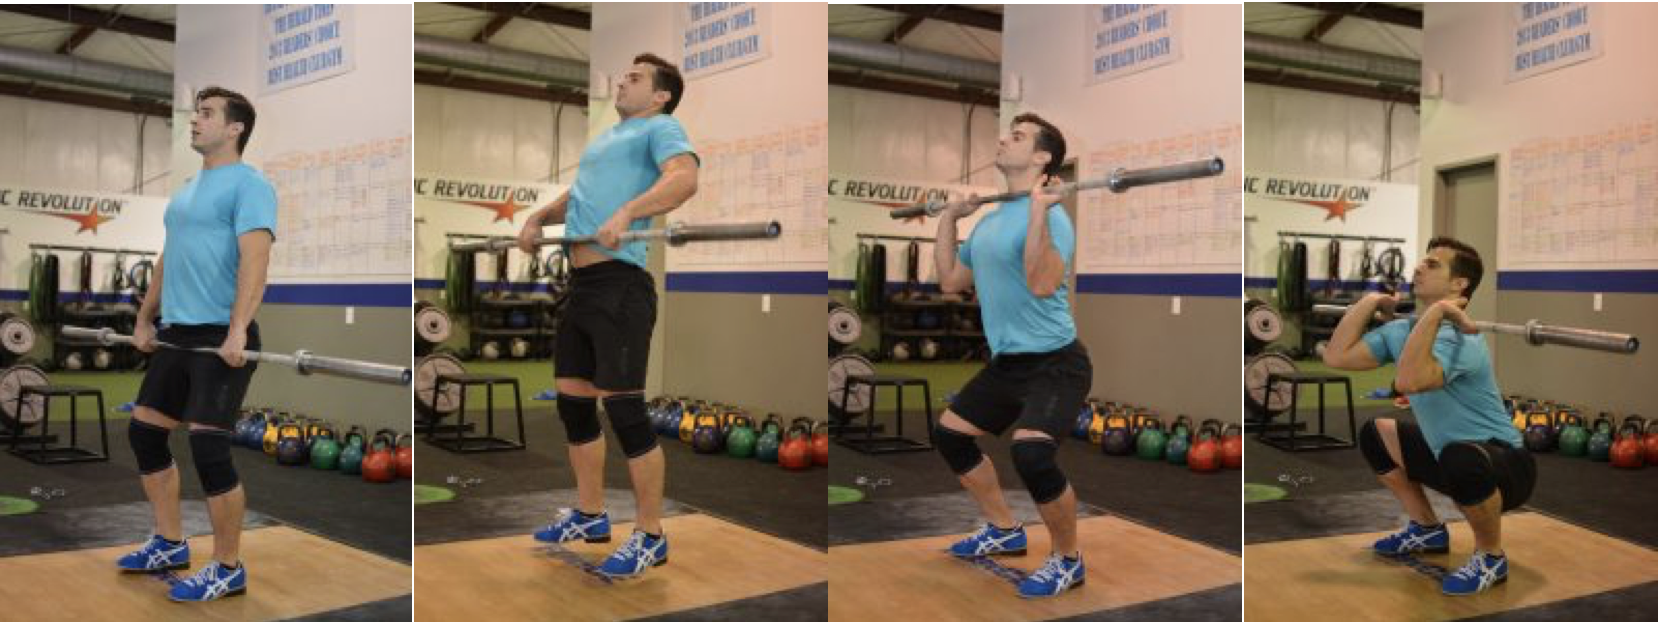
Classically called a power position, the clean from the hip is one of the shorter motions we can use in Olympic lifting. The goal is only to get the bar moving vertically to a point in which it feels weightless and then begin moving under the bar.
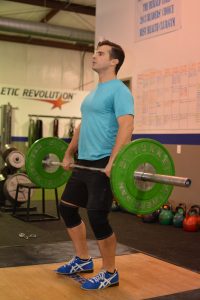
To do the clean from the hip, the athlete should first, stand fully erect. The bar should be resting at a high position on the thigh, and approaching the crease of the hip. Then bend the knees while keeping the torso vertical. At this position, the knees and hips will each be bent at an angle of 120 degrees, and the ankle should be bent at an angle of about 60 degrees. The athlete’s weight should be balanced evenly across the length of the foot, and can be slightly shifted to the lateral aspects of each foot.
The knees will be under or in front of the bar, and the athlete’s chest should be behind the bar.
In the case that an athlete has extremely long arms, which can happen, remember that the “hip” position is only the top position not a specific reference to anatomy. Look to mimic the body positions and not the bar positions no matter the length of your arms. Torso vertical and arms slightly bent. While the hip, as a marker to the start position, is likely unattainable, the goal is still to create a bar path that accelerates in the vertical plane and not the horizontal plane of motion.
The alternative to this vertical torso position, one in which the chest is in front of the bar and the hips are behind the bar, can lead to a missed lift or, at best, a serious technical error. Unlike the snatch, in which a seasoned athlete may be able to lean their torso forward to balance the weight overhead, a forward clean is ALWAYS missed, unless the athlete is able to cut their hip extension short and jump forward to receive the bar.
How to Teach the Clean – Download your copy here.
Moving the bar to the shoulders (the 3rd pull)
The action of taking the bar to the shoulders comes as a result of the coordinated action of the lower body and the upper body simultaneously.
The hip position is one that takes much of the thinking out of the lift, the action of the lower body is very simple. Extend, violently. A common coaching cue is just to “jump the feet,” as we do in the transition drill. Hip extension is often thought of as the primary mover, but if we start in the right position: knees bent, torso vertical, knee extension will play a nearly equal role in the power output of the athlete.
The action of the lower body should immediately transition from extension to flexion, or the idea of opening the hips followed by immediately closing the hips. Pausing in extension, or over pulling is a mistake that should be avoided. Think back to the transition of the feet drill, and jump then sit.
It is often said that we must pull under the bar in this stage. Using that idea as a reference, the action of the lower body and upper body become much clearer. The lower body must sit beneath the bar, and the upper body acts on the barbell to accelerate our body’s motion under the bar.
Over pulling is a problem that we often see occur in the clean, much more so than the snatch. Maybe it is due to the loads that are used, and a feeling that we must pull it higher, or possibly it could be due to an over exposure of power cleans during younger formative training. This problem must be avoided for maximum efficiency in the movement. Once the hips are extended, trying to pull higher and higher will only hinder the lift. Instead, the athlete must immediately transition to moving under, or pulling under the bar and preparing to receive it.
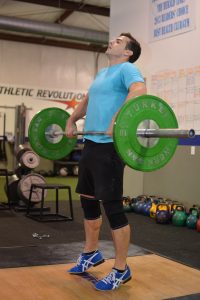
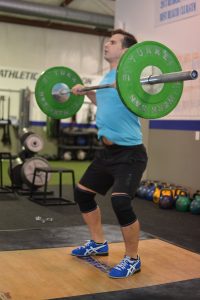
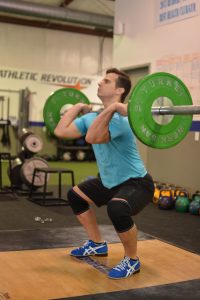
Moving the Bar to the Shoulders: Extension at the Hip, Retreating the Hip, Receiving the Bar
The second piece of taking the bar to the shoulders is the coordinated action of the arms. This portion of the lift should take place after the extension of the hips, but not before. Involving the arms in the pull earlier than this is a problem called early arm bend, and will likely lead to even greater technical errors.
Early arm bend is much more common in the clean than snatch, due to the athlete trying to get the bar closer and closer to the hip. Resist this temptation and keep the arms long and relaxed, focusing on a strong grip rather than bending of the elbows.
This motion of the upper body will begin with shrugging the shoulders upward. This punch of the traps continues the brief weightlessness of the bar that we try to create through hip and knee extension. The action of the arms is similar to that of the snatch, but must be even faster due to the short distance the arms must travel. As the hips are retreating, the elbows should be moving up, and back, while the hands stay tight to the body.
It is important to note that the elbows must move up and BACK for the lift to be successful. If the elbows move directly to the side, or in front of the body, the bar will be too far away from the body, to act as a good pivot about which we can rotate. The bar must be pulled tight to the body, and because of this, the elbows should move up and back.
Focus on maintaining a tight grip and straight wrists. A loose wrist, one that flexes as the bar rises, will lead to a loop at the top of the bar path and a crashing sensation of the bar on the shoulders. The flexed wrist is a problem that comes about during over pulling.
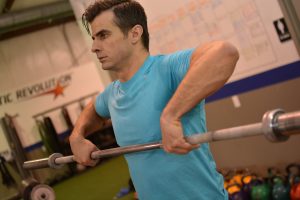
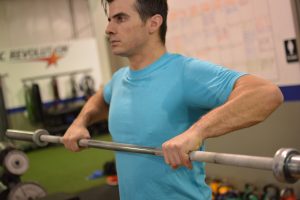
Flexion of the Wrists in the Pull Vs. Tight Wrists in the Pull
As the athlete moves under and the elbows move up and back there will be a natural moment in which the bar and the shoulders are at an equal level. It is in this moment that the athlete must externally rotate the shoulders and punch the elbows through. In a similar manner to the snatch, in which we talk about flipping or punching the hands over to receive the bar, in the clean, the athlete should be cued to punch the elbows through.
This must be an aggressive move, and not a passive one. A passive, slow, or incomplete turnover will result in the bar resting on the arms and not the shoulders. At limit weights, this will not allow the athlete to support the weight.
At this point the athlete will be receiving the bar at nearly the full front squat depth. Depending upon the weight used this may be 1/2 way or greater of the full front squat position. In the case that an athlete receives the bar in a position higher than the full front squat, they should finish their descent, reach the bottom position, and then stand back up.
Most cleans will be received, or at least racked on the chest, at a position that is higher than the full front squat position. Due to the extreme nature of the weights used, receiving the bar in the full squat position often creates a lift that is too difficult with which to stand up. Instead, most athletes take advantage of the stretch shortening cycle to make the front squat portion of the lift an easier task. In this manner, it is important to think about receiving the bar and “bouncing” from the bottom of the lift to stand up more easily.
If we recall the front squat position that is necessary for maximum weights, we will remember that it is necessary to front squat, and thus, receive the bar with a torso that is nearly vertical in relation to the ground. To achieve a vertical torso position, we must also think about how it is that the athlete should pull under the bar.
The pull under, or jump under should be done by reciprocal action of taking the torso vertically to complete the 2nd pull, and then retreating the hips with a vertical torso as well. Actions in which the torso extends behind the vertical plane to a great degree will affect the reciprocal movement, and cause the torso to thrust forward to receive the bar again.
Sequence of a Clean from the Hip
Clean from Below the Knee
Similar to the snatch, the next step of the clean progression is to move the athlete to a below knee position. The below knee position is selected as the next step because it encompasses the over-pull portion of the first pull, and nearly the entirety of the second pull. The transition around the knee is, again, difficult for many athletes, due to the greater weights used in the clean vs. the snatch. A poor pull around the knee during the clean can amplify the negative effects of this action.
The transition to the knee level from the hip should be accomplished by simply doing an RDL movement, or hip hinge movement until the bar passes the knee. By retreating the hips backward, the athlete should be able to get the knees out of the way so that they may initiate the second pull in an aggressive manner.
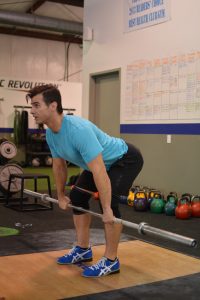
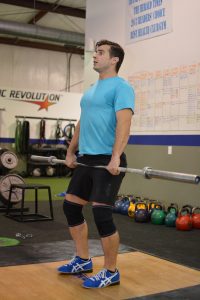
Clean from the Hip Position Vs. Clean from the Knee Position Comparison
Throughout this lowering of the barbell to the knee level, the athlete should keep the bar squeezed tight to the body through activation of the lats and upper back. The torso should be rigid through bracing of the core musculature, no flexion of the lumbar spine should occur.
The motion of lowering the barbell should be through a hip hinge, or flexion at the hip. There should be no additional flexion of the knees, but no extension either. The angle of the knees should stay relatively constant at, roughly, 120 degrees. This angle of knee flexion should be about the same from the knee position to the hip position. This point is made to emphasize that the majority of the movement completed to lower the barbell should be done through hip flexion, not increased knee flexion.
Similar to the snatch, once the bar reaches the below knee level, several positions can be observed. Primarily we are looking for knee flexion of 120 degrees, a vertical shin angle, and an extreme degree of hip flexion. This degree of hip flexion will be less in the clean than in the snatch due to the grip of the clean being narrower than that of the snatch. The eyes of the lifter should be focused straight ahead at a point level to the ground. The athlete’s arms will be angled back toward the body, with the chest and head in front of the bar at this point in time.
It is important to note that at this position, the athlete’s chest will be in front of the bar, and a tremendous stretch will be placed across the hamstrings and glutes. Ultimately this stored power will be necessary to accelerate the barbell once we pass the knees on the way up.
At the knee level, the balance of the athlete’s weight will be almost entirely focused on the heels. Most lifters can even wiggle their toes within their shoes at this position. This phenomenon is caused by the need to pull the bar tight to the body and shift it closer to in-line with the lifters own center of mass (the hips).
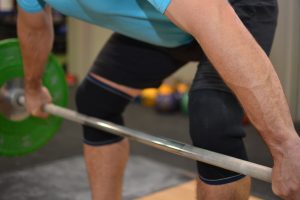
Athletes may choose to press their knees out, due to hip external rotation, when the bar is at the knee level. Doing so will make the first pull a bit easier. Especially for the taller athlete, a knees-out cue during the clean will make the movement happen a bit more rapidly.
Transitioning back to the hip
The transition from the knee to the hip must ultimately occur very rapidly and precisely. Missing positions on the way back up can cause an athlete to miss the lift.
The proper movement from knee to hip is completed by initially passing the knee by increasing the angle of the hip. This is technically considered an over-pull, the extension of the first pull, but not yet the aggressive 2nd pull. Once the bar passes the knee the primary motion to move the bar to the hip is to open the torso and rotate at the ankle while maintaining flat feet.
Incorrectly, the bar can be moved to the hip by continuing to extend the knees and not the hip. This motion leads the athlete to stay over the bar too long, with their chest forward. Ultimately the bar will have a horizontal displacement, leading to a clean that is forward of the athlete. The bar may both stay tight to the body, or drift away as it travels upward, but in either case, it will be met by hips that are moving forward and not up.

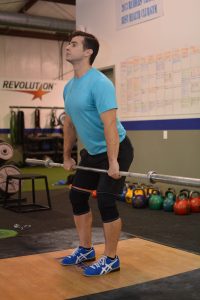
INCORRECT 2nd Pull (North Pull) Vs. CORRECT 2nd Pull (Normal RDL)
Instead the motion should be to maintain the knee bend and increase the hip angle. Allowing the athlete to move the bar up the thigh to the hip position. Ultimately, we are looking for the bar to reach the same position we have already practiced at the hip level.
Floor Start Position
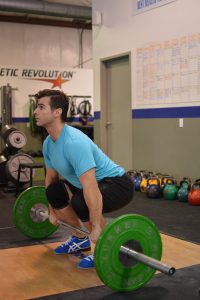
Like the snatch, the physical anthropometrics of the athlete will dictate much of the start position. Joint angles of the hip, ankle, and knee as well as their relationship to the floor can only be determined by a process of trial and error and individual comfort.
Nearly every lifter will exhibit different positions at the floor, but there are a couple constants that must be present in every successful lifter.
-At the floor position the arms will be vertical in relation to the ground.
-The knees will be even with, or in front of the elbows.
Generally we can also say the following, with some slight variation:
-The torso should be inclined upward to some degree, and not flat.
-The athlete’s weight should be balanced over their entire foot.
-The bar should be over the base of the athlete’s big toe.
This means that the start position of the snatch and clean for an individual lifter share more in common with one another than do the start positions of the clean from athlete to athlete.
Getting to the Floor from the Knee: Clean
In working our way down this might be the simplest step of them all. From the knee position, moving to the floor is as simple as just squatting to the ground.
In my seminars, I cue this in a simple way.
-Hip position: Bend the knees
-Knee position: Hips back
-Floor position: Hips down
Once the bar is at the knee position, the knees are back and out of the way so the over-pull (passing the knee) and second pull can be completed, and the hips are fully loaded. Going to the floor from this position means locking in the torso position and descending to the floor with the hips.
When the hips drop, the arms will be vertical at the floor, the knees will be forward of the elbows, and the bar will be centered above the base of the big toe. Be sure that on the descent, there is no forward movement of the bar placing it forward of the big toe. When doing this with the clean, forward movement of the bar is common.
The only real differences between the snatch and clean at the floor position are in the height of the hips, and angle of the torso due to the narrower grip on the bar.
Strategies for Leaving the Ground
Leaving the ground and getting to the knee can be one of the most difficult parts of the lift, and more lifts than not go wrong in this phase of the lift. An athlete without the right strategy or physical strength may have a very difficult time initiating the pull from the ground.
The initial lift off from the floor should be done by extension of the knees. Driving the knees back but lifting the torso is what we are aiming for. The most helpful cue at this point is to push the hips up AND back.
When leaving the ground, the athlete should think about keeping the chest up as the bar moves up the shin to the knee level. In the clean movement, a common mistake is to let the chest drop and almost face the ground while the bar rises. Instead, keep the eyes focused on a point ahead of you and fight to keep the chest up.
The motion of the torso may be a bit dynamic, as it catches up the suddenness of the bar leaving the ground. While the goal is to keep the chest up at the start position and again when the bar is above the knee, the actual mechanics of the movement typically see an athlete drop the chest instantaneously while the bar is mid-shin level, but then see the chest rise again as the bar reaches the level of the knee.
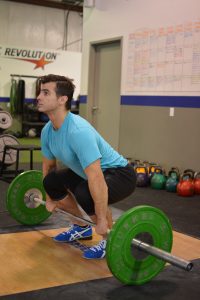
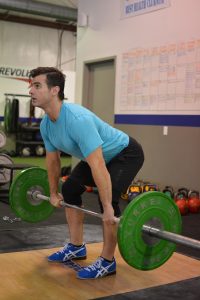
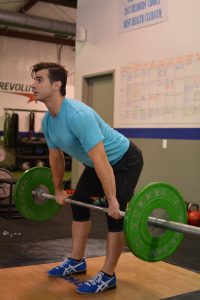
Leaving the Ground: Start Position, Mid-Shin, Knee-Level
The pull may be initiated in the same manner, or different than the snatch. Both a static start and dynamic start are utilized by many top lifters. It should be said though, that a dynamic start is often preferred in the clean because the weight is harder to move from the ground. Any athlete should prioritize using a static start from the ground before attempting a dynamic start to show mastery of the start position.
Download the entire ‘How To Teach the Clean’ instructional guide here.
To see exactly how Coach Wil Fleming teaches, coaches and trains the Olympic Lifts,
check out his Complete Olympic Lifting Program
About the Author
 Wil Fleming is the owner and founder of Force Fitness and Performance in Bloomington, IN. Wil is the creator of the Certified Weightlifting Performance Coach course and is a sought after speaker on the topics of power development, speed, and strength training for athletes. He is also a sports performance coach and expert on being a more explosive athlete. His expertise comes from years of training and coaching athletes in multiple sports. His athletes are routinely the most explosive, fastest, and strongest on the field. He is also one of the strongest medium sized guys you will ever run into boasting some pretty decent numbers on the platform and in the weight room.


0 Comments for “How to Teach the Clean”